ec2でポートを開放しNginxを通信可能にする(FireWallの設定)
その前に、、
ポートの開放80のHTTPとHTTPSの違いが気になった
HTTPS 443
HTTP 80 (Nginx)
 第2回 HTTPSの詳細:超入門HTTPS(1/2 ページ) - @IT
本題
ファイアウォールで80番ポートがブロックされているから、ポートの開放(80)をして、Nginxを表示するようにする。
 https://www.dot-plus.com/cloud-service/aws/3175/
ec2>セキュリティグループ>インバウンドルールを編集, ルールの追加
HTTP TCP 80 0.0.0.0/0#←00000は、どのipからでも閲覧可能なことを示す。
↓
インスタンスの再起動
↓
welcome nginxではないが、nginxの404が表示された。

↓
Nginx自体の設定は機能していないが、ポートの80が解放されたことがわかった。
Nginxのコードをなんとなく理解する
Nginxの特徴→リバースプロシキ: webサーバーの分身になって、処理をこなう。処理が大きくなってきたら、新たな身代わりサーバを作成して、負荷を分散してくれる。
理解するコードはこれ。(深くは追わない)
user nginx;
worker_processes auto;
error_log /var/log/nginx/error.log;
pid /run/nginx.pid;

events {
    worker_connections 1024;
}

http {
    log_format  main  '$remote_addr - $remote_user [$time_local] "$request" '
                      '$status $body_bytes_sent "$http_referer" '
                      '"$http_user_agent" "$http_x_forwarded_for"';

    access_log  /var/log/nginx/access.log  main;

    sendfile            on;
    tcp_nopush          on;
    tcp_nodelay         on;
    keepalive_timeout   65;
    types_hash_max_size 2048;

    include             /etc/nginx/mime.types;
    default_type        application/octet-stream;

    # Load modular configuration files from the /etc/nginx/conf.d directory.
    # See http://nginx.org/en/docs/ngx_core_module.html#include
    # for more information.
    include /etc/nginx/conf.d/*.conf;

    server {
        listen       80 default_server;
        listen       [::]:80 default_server;
        server_name  _;
        root         /usr/share/nginx/html;

        # Load configuration files for the default server block.
        include /etc/nginx/default.d/*.conf;

        location / {
        }

        error_page 404 /404.html;
            location = /40x.html {
        }

        error_page 500 502 503 504 /50x.html;
            location = /50x.html {
        }
    }
}
各コードを見ていく
#ps aux |grep nginx |grep -v grepで起動確認時に表示されるユーザ名
user nginx;
#nginxは、複数のワーカープロセスを、一つのマスタープロセスで制御する仕組み。
#autoにすれば自動で設定してくれる。
worker_processes auto;
error_log /var/log/nginx/error.log;
#PID:プロセスに割り振られた識別番号つまりプロセスID
#プロセスについて詳しく→(https://eng-entrance.com/linux-process)
pid /run/nginx.pid;
events {
    #1つのworkerプロセスに対する同時接続数の最大値を指定します。
    #nginx全体の接続数
    worker_connections 1024;
}
http {
    #ログファイルの書式を指定。これはmainという書式
    log_format  main  '$remote_addr - $remote_user [$time_local] "$request" '
                      '$status $body_bytes_sent "$http_referer" '
                      '"$http_user_agent" "$http_x_forwarded_for"';

  #アクセスログのパスと、その書式を指定(main。上に定義されてあるmain。)
    access_log  /var/log/nginx/access.log  main;

    #高速化のためのオプションで、非常に内部的なもの。今回は深くまで追わないことにする。
    sendfile            on;
    tcp_nopush          on;
    tcp_nodelay         on;
   #HTTP接続する時間を指定。繋ぎすぎは、負荷かかる
    keepalive_timeout   65;
    types_hash_max_size 2048;

    include             /etc/nginx/mime.types;
    default_type        application/octet-stream;

    # Load modular configuration files from the /etc/nginx/conf.d directory.
    # See http://nginx.org/en/docs/ngx_core_module.html#include
    # for more information.

  #最後にincludeでconf.dディレクトリ以下のものを読み込むようになっています。
  #設定ファイルを分けて管理するため。
    include /etc/nginx/conf.d/*.conf;
 server {
        #listenは、使用するIPアドレス、ポートを指定する
        listen       80 default_server;#ポート番号80
        listen       [::]:80 default_server;
        server_name  _;
        #ドキュメントルートを指定。webサーバの最上部のdir
        root         /usr/share/nginx/html;

        # Load configuration files for the default server block.
        #最後にincludeでconf.dディレクトリ以下のものを読み込むようになっています。
       #設定ファイルを分けて管理するため。
        include /etc/nginx/default.d/*.conf;

        #特定のルートの処理。深くは追わない。
        location / {
        }

        error_page 404 /404.html;
            location = /40x.html {
        }

        error_page 500 502 503 504 /50x.html;
            location = /50x.html {
        }
    }
参考 nginxの基本的なコマンド
https://qiita.com/Naggi-Goishi/items/effa3afdfdba9fbbaa50
https://www.atmarkit.co.jp/ait/articles/1407/24/news003_4.html
nginxの設定ファイル nginx.conf の読み方 超入門
worker~系
nginxの基本設定を改めてちゃんと調べてみた - Qiita
【技術書要約】nginx実践入門のポイントを3分で押さえる - 初心者インフラエンジニアが困ったときに試行錯誤するブログ
docker pull nginxしたものを編集し、自分のDockerHubにpushしたログ
imageは設計書。containerがそれを元に生成される。
$ docker pull nginx

コンテナ内に入る
$ docker run -it -p 8080:80 nginx bin/bash

viが使えるように
# apt update && apt install -y vim

psコマンドが使えるように
# apt update && apt install -y procps

# ps aux
USER       PID %CPU %MEM    VSZ   RSS TTY      STAT START   TIME COMMAND
root         1  0.0  0.1   3868  3228 pts/0    Ss   01:24   0:00 bin/bash
root       703  0.0  0.1   7640  2744 pts/0    R+   01:35   0:00 ps aux

nginxの起動
# nginx

# ps aux
USER       PID %CPU %MEM    VSZ   RSS TTY      STAT START   TIME COMMAND
root         1  0.0  0.1   3868  3228 pts/0    Ss   01:24   0:00 bin/bash
root       705  0.0  0.0  10636   872 ?        Ss   01:36   0:00 nginx: master process nginx
nginx      706  0.0  0.1  11032  2664 ?        S    01:36   0:00 nginx: worker process
root       708  0.0  0.1   7640  2720 pts/0    R+   01:36   0:00 ps aux
localhost:8080に表示されている
nginx止める
# nginx -s stop
2021/02/25 01:39:26 [notice] 709#709: signal process started

確認したら、止まってる
#ps aux
USER       PID %CPU %MEM    VSZ   RSS TTY      STAT START   TIME COMMAND
root         1  0.0  0.1   3868  3228 pts/0    Ss   01:24   0:00 bin/bash
root       710  0.0  0.1   7640  2700 pts/0    R+   01:39   0:00 ps aux
psやviコマンドをインストールしたから、imageにその設定を上書きする
一旦コンテナから抜ける(コンテナが起動→終了する)
# exit

起動しているコンテナ
% docker ps

起動していないが、存在しているコンテナ
% docker ps -a
ここにさっきのnginxのコンテナが出力される
CONTAINER ID   IMAGE     COMMAND                  CREATED             STATUS                      PORTS                NAMES
c73c04f7366d   nginx     "/docker-entrypoint.…"   22 minutes ago      Exited (0) 49 seconds ago                        keen_hamilton

vi,psのダウンロードをコミット(名前はnginx-devにした)
% docker commit c73c04f7366d nginx-dev
sha256:a8b60f89df5c8bdad6a07e3327a14842f78ca6861f8c1a105103dcc879644684

コミットされて、新しいイメージが生成された。
% docker images
REPOSITORY   TAG       IMAGE ID       CREATED          SIZE
nginx-dev    latest    a8b60f89df5c   10 seconds ago   185MB
次から、そのイメージを使うときは、
docker run -it -p 8080:80 nginx-dev bin/bash
dockerhubにpushする
まずpushするために、tagを自分のdockerHub名に合わせる。そしてpush
$ docker tag 今のレポ名 新しいレポ名
docker images
REPOSITORY   TAG       IMAGE ID       CREATED          SIZE
nginx-dev    latest    a8b60f89df5c   10 seconds ago   185MB

 % docker tag nginx-dev kazumawada/nginx-dev

% docker images
REPOSITORY             TAG       IMAGE ID       CREATED          SIZE
kazumawada/nginx-dev   latest    a8b60f89df5c   35 minutes ago   185MB
nginx-dev              latest    a8b60f89df5c   35 minutes ago   185MB

% docker login
Authenticating with existing credentials...
Login Succeeded

% docker push kazumawada/nginx-dev:latest
The push refers to repository [docker.io/kazumawada/nginx-dev]
5d9b058db477: Pushed
2acf82036f38: Mounted from library/nginx
9f65d1d4c869: Mounted from library/nginx
0f804d36244d: Mounted from library/nginx
9b23c8e1e6f9: Mounted from library/nginx
ffd3d6313c9b: Mounted from library/nginx
9eb82f04c782: Mounted from library/nginx
latest: digest: sha256:35776cc6b34e6f6948a74cd40f884585b4a1cc49bf4683787cf9b72868ef9b73 size: 1782

% docker run --rm -it kazumawada/nginx-dev

#nginx
起動確認
#ps aux
# nginx -s stop
web, AP, DBサーバの全体像をつかむ
結論から言うと現代のWebアプリケーションのほとんどは、Webサーバ・データベースサーバ・アプリケーションサーバの三層構成になっています。 https://qiita.com/tamago3keran/items/f470593926458b7ef52a#webアプリケーション構成の歴史
なぜこの3つになったのか??
↓
最初:
htmlのみの静的ページだったから、webサーバだけで良かった
↓
CGI(クライアント側から情報を操作して、サーバがそれに答える機能):
動的に生成されることが可能になった。
↓
DBの誕生:
クライアントから情報が送られてくるので、DBが必要になった。 (情報分析して、利益を上げるという目的もあったらしい。)
 DBの情報が大きくなっても、CPUと切り離して稼働しているから、負荷がかからない。
↓
webサーバ一つで処理を全てやるより、アプリケーションサーバを横に置いて、プロセスを軽くした。
HTTPリクエストをWebサーバが窓口となって受け取り、動的処理が必要な場合はアプリケーションサーバに処理をお願いするといった役割分担がなされます。
 DBのようにwebサーバと切り離し、それと通信して動かすことも可能。
今のデフォルト:
 3つそれぞれを独立した箱の中で動かし、それぞれ通信している。
参考:
https://qiita.com/tamago3keran/items/f470593926458b7ef52a#webアプリケーション構成の歴史 https://www.amazon.co.jp/「プロになるためのWeb技術入門」-――なぜ、あなたはWebシステムを開発できないのか-小森-裕介/dp/4774142352 https://thinkit.co.jp/article/11837 https://wa3.i-3-i.info/word112.html
ブラウザについてはここを参考に
環境変数とは
OSに格納されている変数
変数を削除、変更することが可能。2つの方法
→・コンピュータの設定を変える(全てに影響が出る)
→・プログラム内から変える(そのプログラム内だけが変わる)このコマンドで一覧をみることができる
% set
参考:
本番環境では、なぜrails sではなくNginx,Puma?
rack(rails s)はあくまで、アプリケーションサーバー。なので、webサーバが持っているような負荷を分散させるための機能などがなく、実運用していく上で、大勢の人がサイトを見たときなどにとても重くなってしまう。
nginx: たくさんの人から、同時アクセスをされもrails sよりも数多くのアクセス数を対応できる。Railsで本番環境を構築するときに、puma, rackだけだと、高速な処理や高負荷に耐えられないため、webサーバであるnginx(pumaはwebサーバだが、貧弱。アプリケーションサーバとして使われる。RailsとRackが必ずセットで。)でそれらに対応できるようにしている。
puma: Rails5から、アプリを起動すると、pumaが内部で動くようになっている 厳密に言うと、Rackを提供するためのアプリケーションサーバ
It is designed for running Rack apps only.
アプリケーションサーバだけでも、機能するが、nginxを加えることで、多い処理に対応できたり、高速化することが可能になる
参考
https://qiita.com/takahiro1127/items/fcb81753eaf381b4b33c
https://kitsune.blog/rails-summary

Nginx, Puma(Unicorn), Racksとは?
Puma(Unicorn) : アプリケーションサーバー
Nginx :Webサーバー
Rails5以降は、Pumaがよく使われている。
 https://qiita.com/naoki_mochizuki/items/5a1757d222806cbe0cd1
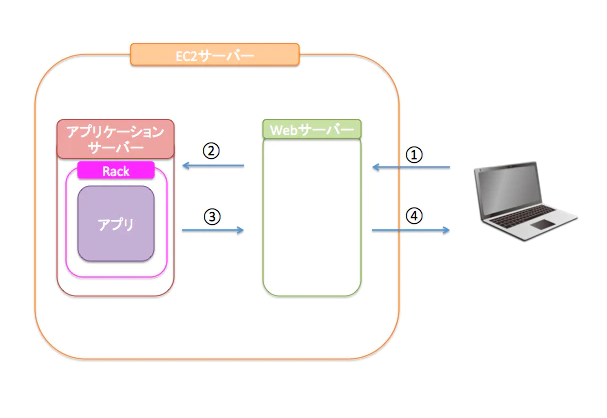
・クライアントからの簡単な命令だと、webサーバが処理してくれる。
しかし、
$ rails s を命令したら、webサーバーでは処理できず、その先にあるアプリに情報が届く。そのアプリ本体がアプリケーションサーバー内に置かれている。
・アプリとアプリケーションサーバーは使われている言語が違う。その仲介をするのがRackと呼ばれるもの
・大半のアプリケーションサーバーは、webサーバーを使わずに単体で実行できます。